


If you have encountered a problem with determining which modem uses which port in Asterisk, you will definitely need the dongle discovery command to obtain information about the IMEI/IMSI of the connected equipment. Entering this information into the dongle.conf file will certainly make your life easier.
Make sure your modem is compatible with chan_dongle. The list of modems is below:
https://github.com/bg111/asterisk-chan-dongle/wiki/Requirements-and-Limitations
Table of Contents
1) Prerequisites
It seems obvious that in order to use the “dongle discovery” command in Asterisk, you first need to have the chan_dongle module installed. If you are using the RasPBX system and you have installed the USB modem support using the install-dongle command, the system should automatically generate the dongle.conf file, in which we will do our configuration.
If you’ve ever tried to add more than one device to chan_dongle, you know that things can get a bit complicated. For example, if you only have one modem then the following command will give us a clear informations and we can very easily add the “audio” and “data” ports in the dongle.conf file.
ls -l /dev/ttyUSB*

However, if you have more modems and, even worse, you disconnect and reconnect them to USB ports, the definition of which modem uses which port is not so clear-cut.
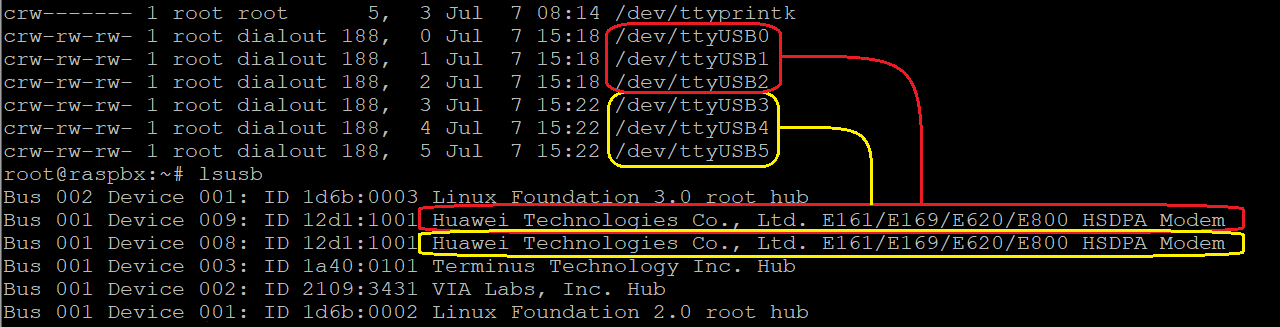
What’s worse, changing the order of connection will cause our devices to have different ttyUSB ports than we predefined. In this case, we recommend connecting using IMEI and IMSI numbers instead of the “audio” and “data” ports. To determine this data, we can use the dongle discovery command.
It is worth remembering that it is best to choose one of two solutions: either a pair of audio+data variables or imei+imsi.
2) “dongle discovery”
After connecting our USB modems, we can log in to the Asterisk CLI (asterisk -r), and then execute the command:
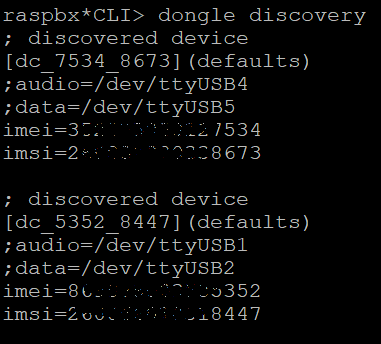
dongle discovery
The command should display the detected devices, and the result can be immediately pasted into our dongle.conf file.
Alternatively, we can immediately put the result into the configuration file with the command:
asterisk -rx 'dongle discovery' >> /etc/asterisk/dongle.conf
As you can see, the command generates entries in the following format:
- ; discovered device – commented information that the device was detected by
dongle discovery - [dc_1234_5678] – device name, where 124 are the last 4 digits of the IMEI and 5678 are the last 4 digits of the IMSI
- ;audio=/dev/ttyUSB1 – detected audio port (commented out)
- ;data=/dev/ttyUSB2 – detected data port (commented out)
- imei=123456789012345 – detected 15-digit IMEI number
- imsi=123456789012345 – detected 15-digit IMSI number
Then, in the Asterisk console (asterisk -r), reload the chan_dongle module to be able to fully start using the new devices. Device information should appear on the console.
					dongle reload now
dongle show devices

Of course you can change the device names from the format [dc_1234_5678] to e.g. [dongle0]. This is a matter of personal preference.
On the other hand, if you use systems with a graphic interface (like FreePBX or Issabel), viewing the serial numbers of the device that made the call also has its advantages.

For instructions on how to configure a Custom Trunk to make calls using chan_dongle, see the article below.

Do you really know what is happening on your PBX? Let’s try our own VOIPERO software.
The application arleady has launched and now is completely FREE. Setup takes only a few minutes.
Read what our VOIPERO system can do in terms of reporting & live monitoring of VoIP systems based on Asterisk.