


The fact that after installing 3CX you cannot use it immediately has surprised many users of the system. If you are used to Asterisk systems, where installation is enough to be fully functional, then 3CX works completely different. Correctly configured port redirections are REQUIRED for the system to function.
At first glance, this seems like a strange idea. However, if you’ve been struggling with one-way audio or disconnecting calls after 32 seconds, then requiring correct redirects right from the start is no longer so silly ?
Of course, 90% of those reading this will find they have a different firewall and cannot take full advantage of the commands described here. So let me say at the outset: Google is your good friend.
In this post, I will show you how to properly configure Fortigate 60C, if only because most users do not use the latest Fortigate 50F, and even if, the commands will be very similar … well, maybe not counting SIP ALG, which can be turned off a bit differently in different versions.
Table of Contents
1) Ports list
Below is a complete list of 3CX forwarding ports (for version 15+). This, of course, applies to the default values, unless otherwise configured during installation.
| Port | Protocol | Description | Required? |
|---|---|---|---|
| 5001 or 443 | TCP | HTTPs port of Web Server. This port can be configured | Yes – if you intend on using a 3CX client, Bridge Presence, Remote IP Phones from outside your LAN and 3CX WebMeeting functionality |
| 5015 | TCP | his port is used for the online Web-Based installer wizard (NOT 3CX config command line tool) only during the installation process | Optional – During the installation process when the Web-Based installer is used from external source |
| 5060 | UDP & TCP | 3CX Phone System (SIP) | Yes – if you intend on using VoIP Providers and Remote Extensions that are NOT using the 3CX Tunnel Protocol / 3CX SBC |
| 5061 | TCP | 3CX Phone System (SecureSIP) TLS | Yes – if you intend on using Secure SIP remote extensions |
| 5090 | UDP & TCP | 3CX Tunnel Protocol Service Listener | Yes – if you intend on using remote extensions using the 3CX Tunnel Protocol (within the 3CX clients for Windows / Android / iOS) or when using the 3CX Session Border Controller |
| 9000-10999 | UDP | 3CX Media Server (RTP) – WAN audio/video/t38 streams | Yes – if you intend on using remote extensions, WebRTC or a VoIP Provider |
| 2528 | TCP | 3CX SMTP Server – Must allow PBX passthrough on the network for the PBX to send email notifications via the 3CX SMTP | No |
2) Port forwarding
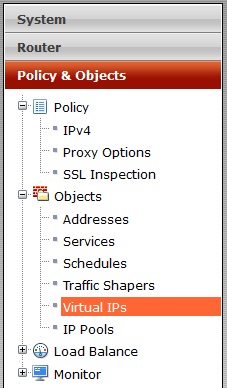
For starters, go to VDOM (if you use) and then “Policy & Objects” > “Objects” > “Virtual IPs” > “New Virtual IP“
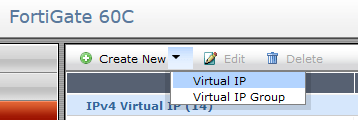
Then define the following variables (I didn’t describe the variables we don’t need):
- Name – unique name eg. 3CX SIP UDP
- Interface – you can optionally select a public interface, e.g. wan1
- External IP Address/Range – public IP address
- Mapped IP Address/Range – local PBX IP address
- Port Forwarding – port(s) to be forwarded
- Protocol – eg. UDP
- External Service Port – port to be forwarded eg. 5060-5060 (or port range eg. 9000-10999)
- Map to Port – local port eg. 5060-5060 (or port rage eg. 9000-10999)
We won’t be defining the “Source Address Filter” at this time, but we can narrow down the traffic coming from the “IPv4 Policy” level.

Configure all the other ports described in Ports list

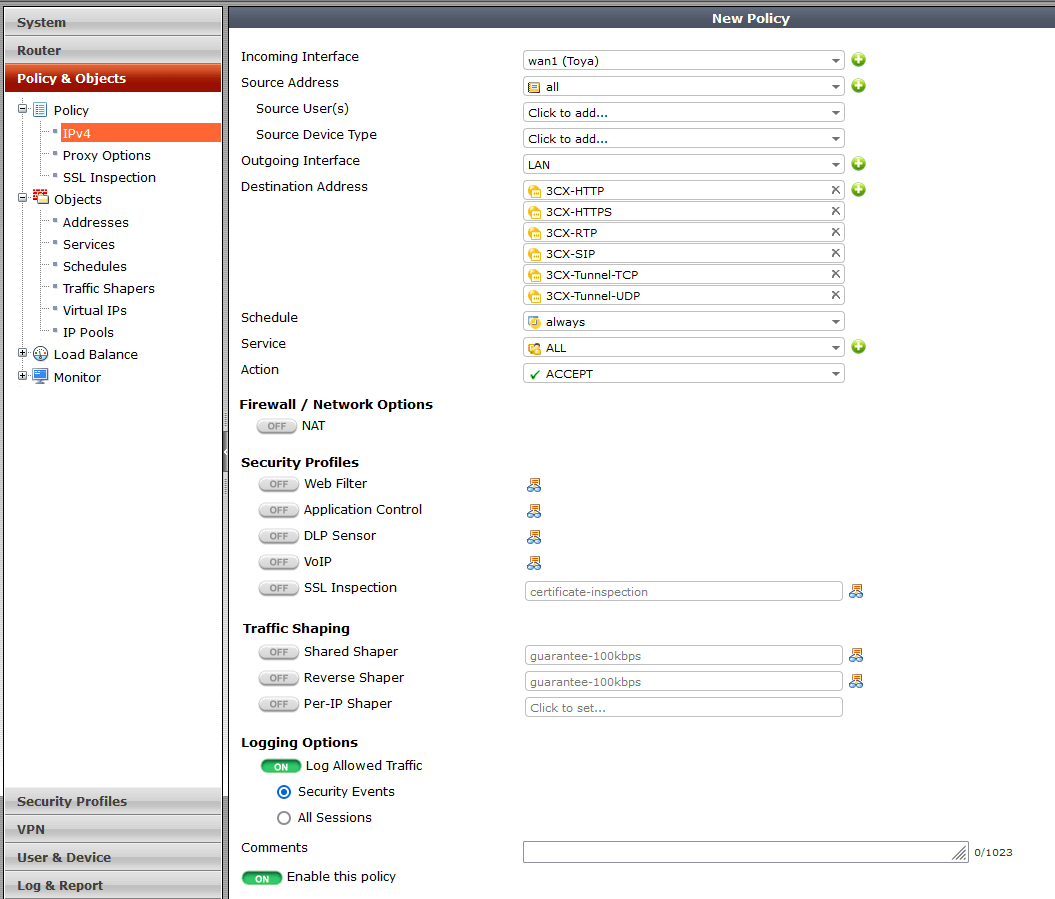
Finally, add a plity for incoming traffic in “Policy & Objects” > “Policy” > “IPx4” > “New Policy” and inside:
- Incoming Interface – public interface eg. WAN1
- Source Address – ‘all’
- Outgoing Interface – local interface eg. LAN
- Destination Address – select from the list all redirections defined in “Virtual IPs”
- Schedule – ‘always’
- Service – ‘ALL’ or individual services, if defined
- Action – ‘ACCEPT’
- Firewall / Network Options
- NAT – ‘OFF’
- Security Profiles / Traffic Shaping / Logging Options – according to your preferences
- Enable this policy – ‘ON’
3) SIP ALG
SIP ALG (SIP Application Layer Gateway) is a solution that aims to prevent some problems caused by router firewalls by checking VoIP traffic (REGISTER, INVITE packets) and modifying the information if necessary to solve NAT problems. In practice, however, this causes more problems than it solves.
So let’s turn off SIP ALG in our Fortigate 60C.
Source: https://kb.fortinet.com/kb/documentLink.do?externalID=FD36405
Removing the corresponding session helper. Check the ID of the sip session helper:
					# config system session-helper
 show
Among the displayed settings will be one similar to the following example:
					edit 13
 set name sip
 set protocol 17
 set port 5060
next
Here entry 13 is the one which points to SIP traffic which uses UDP port 5060 for signaling.
In this example, the next commands to remove the corresponding entry would be:
					 delete 13
end
Note that it is not necessary for the SIP entry to be 13, so cross verify which entry has the sip helper settings.
Change the default–voip–alg-mode to disable SIP-ALG.
By default, SIP-ALG is enabled, and only by the following command which can be verified with “show full”
By running the following command, we tell the FortiGate to disable SIP-ALG (proxy-based) and use SIP-helper (kernel-helper-based):
					# config system settings
 set default-voip-alg-mode kernel-helper-based
 set sip-helper disable
 set sip-nat-trace disable
end
Either clear sessions, or reboot the FortiGate to ensure changes take effect. The command to clear sessions applies to ALL sessions unless a filter is applied, and therefore will interrupt all traffic!
# diagnose system session clear
Alternatively, reboot the FortiGate using either GUI or CLI. The CLI command is:
# execute reboot
It is also possible to disable SIP-ALG from the VoIP profile if needed. In this case SIP traffic will be handled by the SIP-helper even if the default-voip-alg-mode is set to proxy-based. This allows SCCP to be handled by SIP-ALG and SIP by sip session-helper.
					   # config voip profile
   edit default
   # config sip
   set status disable
  end
 end
end
Personally, I usually just restart Fortigate, but of course you’ll do as you see fit.
And it is worth remembering that if you have VDOMs, you have to apply these changes for each of them individually.
4) Static NAT 1:1
Unfortunately, setting the incoming traffic redirection does not guarantee that our server will answer queries with the same port. As a result, firewall tests may show “port mismatch”. To solve this problem, it is worth adding a static NAT 1-to-1 for the traffic outgoing from the VoIP server.
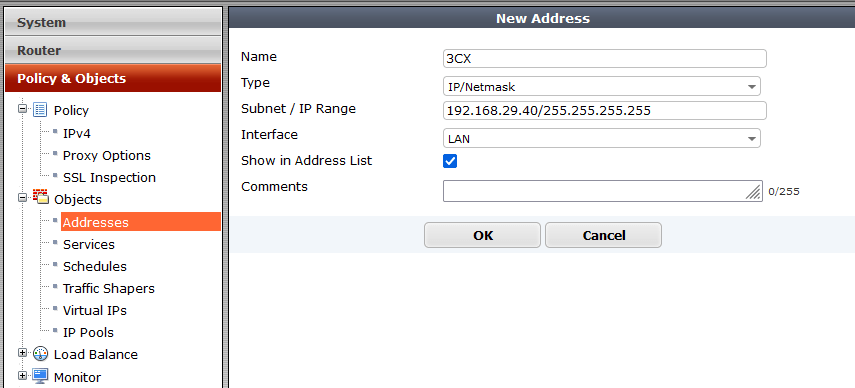
To add these settings, let’s first define our local IP address in “Policy & Objects” > “Objects” > “Addresses” > “New Address” and inside:
- Name – name eg. 3CX
- Type – ‘IP/Netmask’
- Subnet / IP Range – local PBX IP address
- Interface – ‘any’ or eg. LAN interface
- Show in Address List – checked
Next, we will add our public IP address in “Policy & Objects” > “Objects” > “IP Pools” > “New Dynamic IP Pool” with settings:
- Name – name eg. WAN1
- Type – ‘One-to-One’
- External IP Range – public IP address
- ARP Reply – unchecked (checked by default)

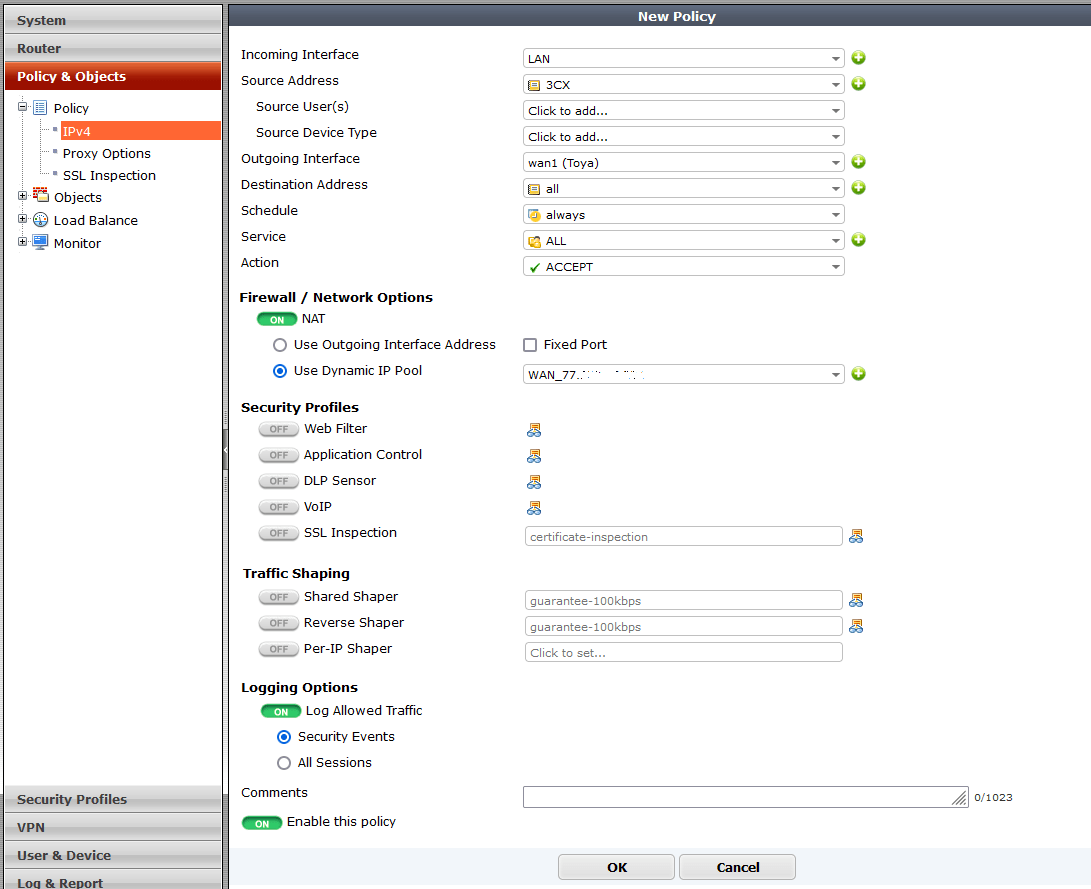
Finally, add outgoing policy in “Policy & Objects” > “Policy” > “IPx4” > “New Policy” and inside:
- Incoming Interface – local interface like LAN, VLAN or alike
- Source Address – address defined in “Addresses”
- Outgoing Interface – public interface eg. WAN
- Destination Address – ‘all’
- Schedule – ‘always’
- Service – ‘ALL’ or individual services, if defined
- Action – ‘ACCEPT’
- Firewall / Network Options
- NAT – ON
- Use Dynamic IP Pool – select from the list the item previously defined in “IP Pools”
- Security Profiles / Traffic Shaping / Logging Options – according to your preferences
- Enable this policy – ‘ON’
Applying all the above settings will make the Firewall in 3CX pass all tests and you will be able to start using your 3CX instance without any problems.
This is only a basic configuration of port forwarding, and it does not take into account additional security, such as, for example, limiting incoming traffic to specific IP addresses and / or FQDN * .3cx.com.