If you have already installed Proxmox, you can now proceed to install the machines you need. You can read how to install the Proxmox virtualization tool itself in this article: Installing and configuring Proxmox
In this tutorial you will find source of installation files. We show you how to create a virtual machine and install Windows on it with neccesary drivers. Additionaly we describe how to configure your server.
Table of Contents
1) Installation files
First, download the windows server image from manufacturer’s website and upload it to your local Proxmox drive.
Then download the VirtIO virtual machine drivers. They are recommended for running your virtual machine more efficiently on existing hardware – rather than on slower, emulated devices. Also upload this iso file to the location shown above.
Windows VirtIO Drivers– link to Proxmox Wikipedia.
This official Proxmox website contains a link to the server Fedora, where can we find the iso file we need. (virtio-win.iso)
2) Creating a virtual machine
Now create a new virtual machine. Press in the main Proxmox window – Create VM.
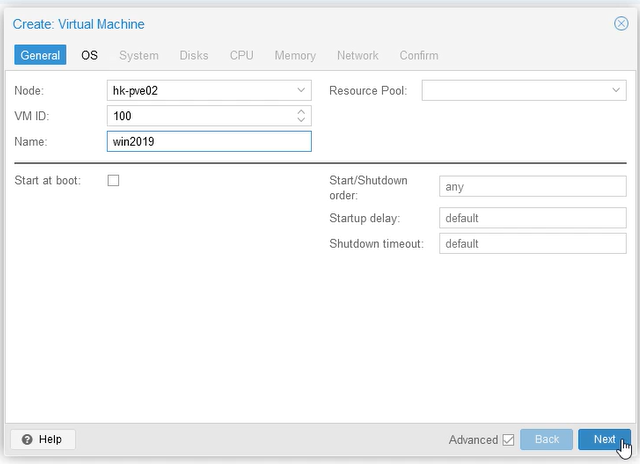
The wizard will guide you through the configuration options. In the first General tab, enter any machine name and click Next.
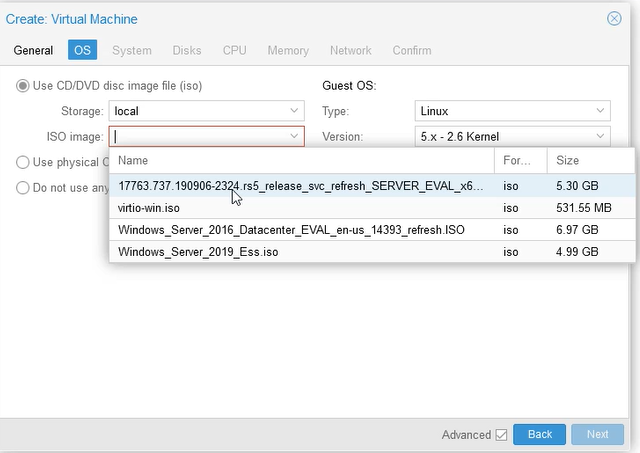
In the next tab: OS (Operational System), select the Windows image from the previously downloaded ISO disc.
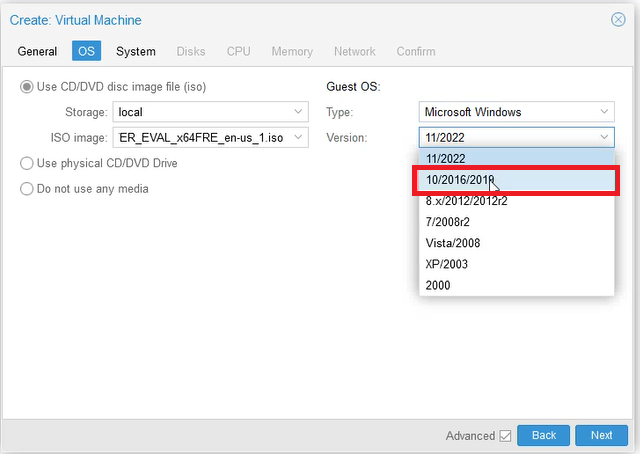
We need to change the type of the hosted operating system (Guest OS) to Microsoft Windows (Type field).
We also choose the appropriate version of the system (Version) – we have 10/2016/2019 and click Next.
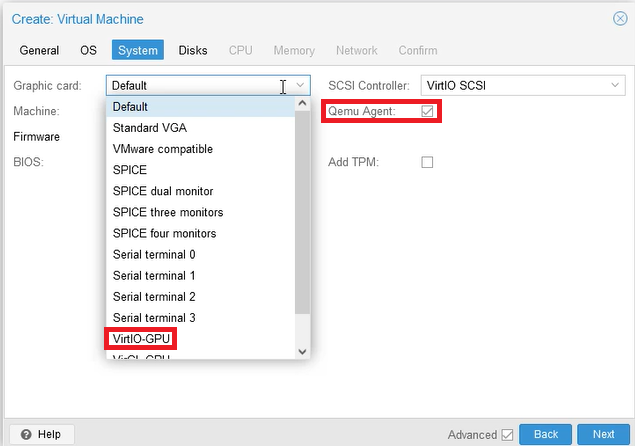
In the next tab: System, select the Qemu agent. We will use it later for advanced communication of our system with Proxmox. We also set the virtual graphics card: VirtIO-GPU. Wherever possible, we choose VirtIO (Virtual In/Out) devices, to which we will then upload drivers. Optionally, you can select: Add TPM, i.e. the encryption module. We’re not doing it now because we won’t be using it.
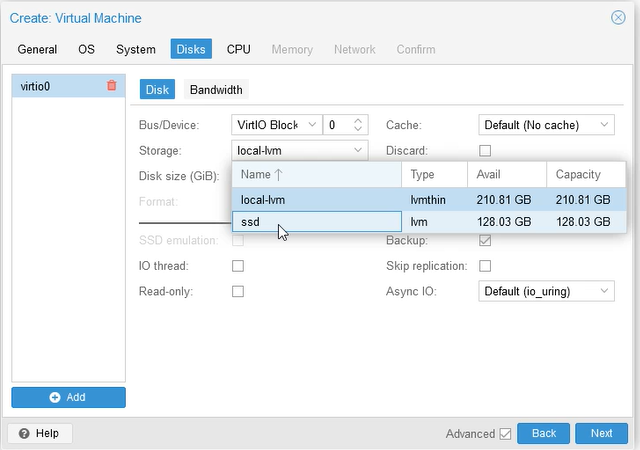
In the next tab: Disks, set the same principle: VirtIO Block, selecting the type of supported device. We’ll add the drivers later.
On the same tab: in the Storage field, we select a physical disk available on our Proxmox on which we will place our operating system. The ssd option is the best for us when it comes to speed.
We can change the allocated disk size. How much memory we need, depends on the minimum requirements of the operating system. We also need to plan the disk space for the applications we will use on the server. 60 GB is enough for us.
In the fifth tab: CPU, enter the number of cores on which the machine should work. Choose a quantity that will allow you to use the machine smoothly while taking into account the capabilities of the host. For us, it will be optimally 4 cores.
At this point, it is worth changing the processor type to: host. Thanks to this, instead of VirtualCPU, we will see our real processor, e.g. i5-6500, etc… Leaving the default selection may be practical if we move our server to another virtualization machine, where would be a different type of processor. Then we do not have to worry that the system will see a different processor than before.
In the tab: Memory, add as much RAM as you need to use all the necessary services. Remember about the minimum system requirements. In our solution, 4GB is enough.
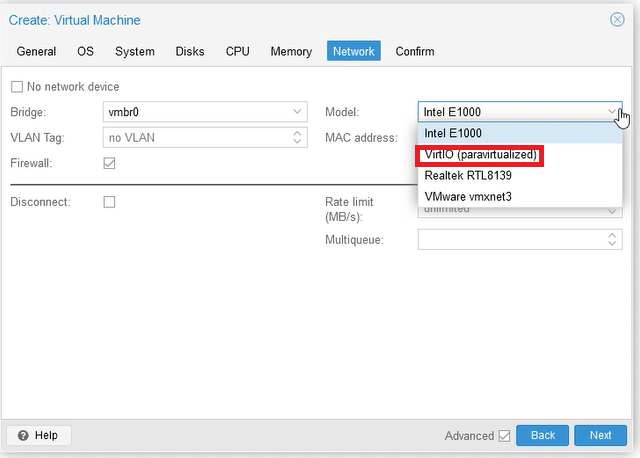
Finally, in the Network tab, the system defaulted to the only network card that Proxmox has, i.e. vmbr0. In the Model field, select the type of network card as VirtIO (paravirtualized), to be able to download dedicated drivers later.
By clicking Next, we reach the tab: Confirm, where we confirm the configuration of the virtual machine and click Finish.
3) Installation of drivers and Windows operating system
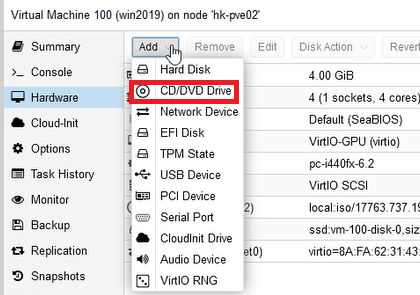
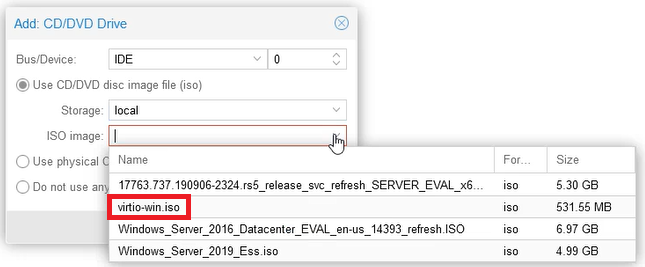
Once the virtual machine is created, it will appear in the main proxmox tree. In the new machine: in the Hardware tab, we already have the Windows installer disk in the CD/DVD drive, which we indicated when creating the virtual machine. At this point, however, we need a second CD/DVD drive with our driver CD. So we choose Add > CD/DVD Drive.
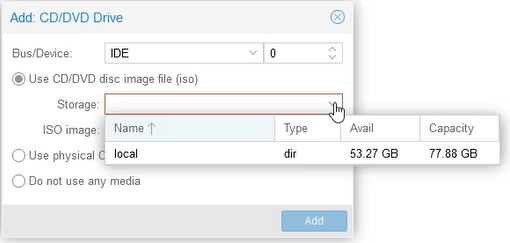
In the Storage field, select an available local resource and from it: in the ISO image field, add the disc to the drivers: virtio-win.iso
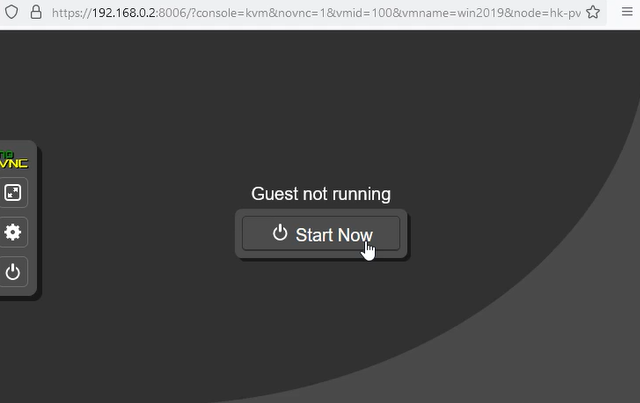
Then, go to the Summary section and launch our server’s console: Console > NoVNC. We start the machine by clicking Start Now
The Windows installer will now start. Select the desired language, time and keyboard settings from the list.
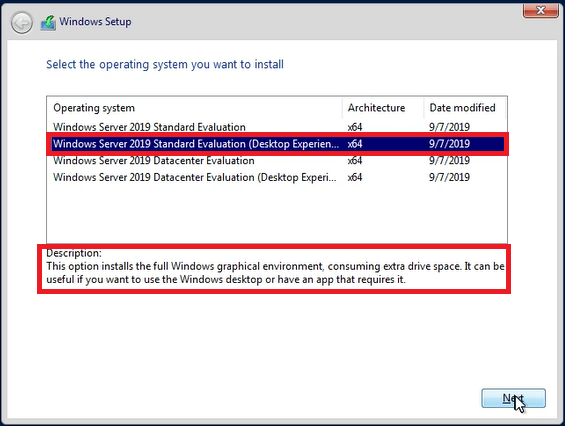
The installer will ask you to select the system you want to install. Change the default proposal from the first position and select “Windows Server 2019 Standard Evaluation (Desktop Experience)”. Desktop Experience means that the system will use graphical mode instead of text-only.
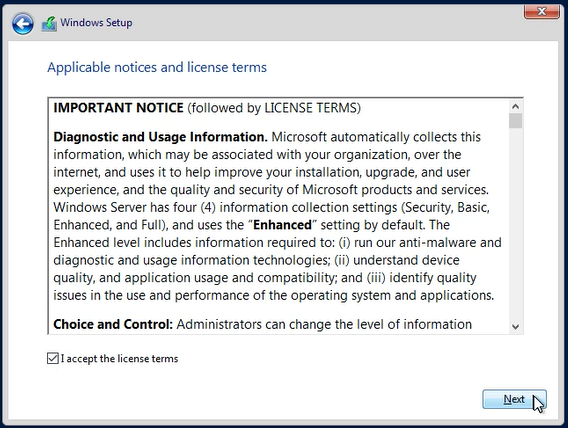
Read the license (because everyone reads before moving on 😅) and accept.
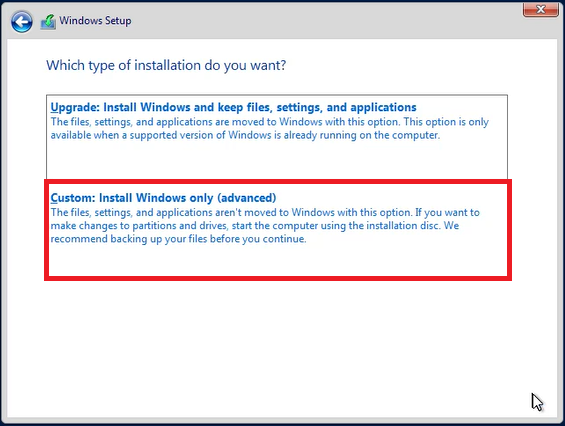
In the next step, select the installation type: “Custom: Install Windows only (advanced)”.
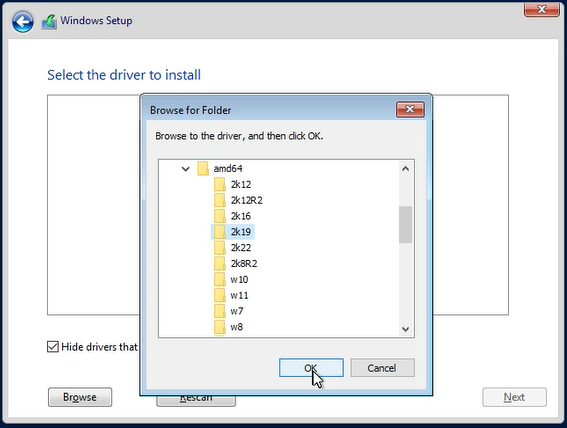
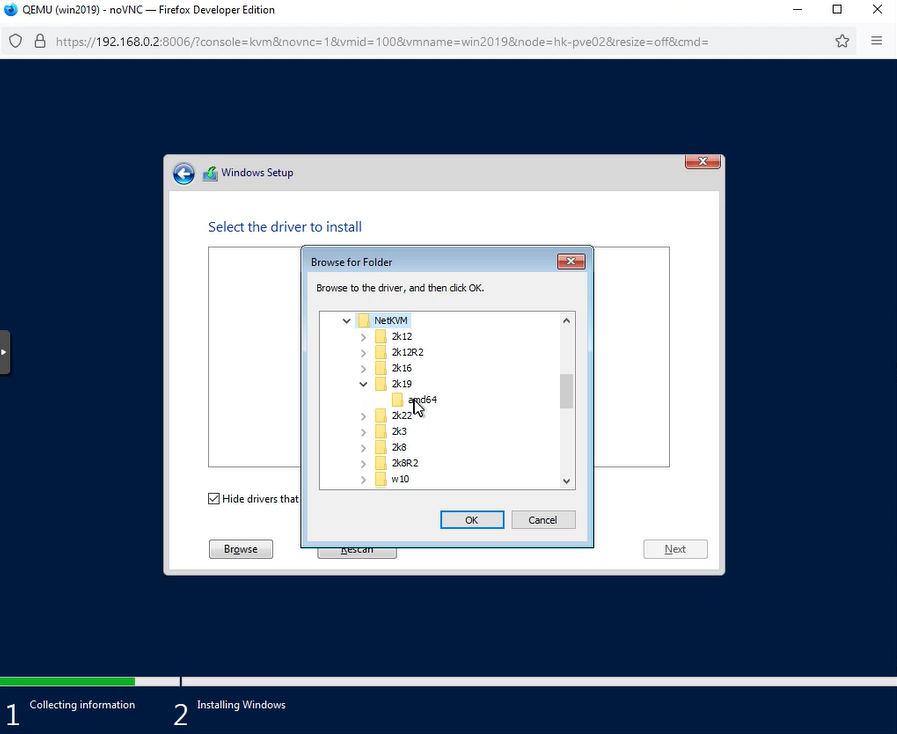
Our machine lacks the required drivers, so it can’t even see the disk space on which it could install the operating system. We now need to click: Load driver, and then: Browse to select the file system from our second drive.
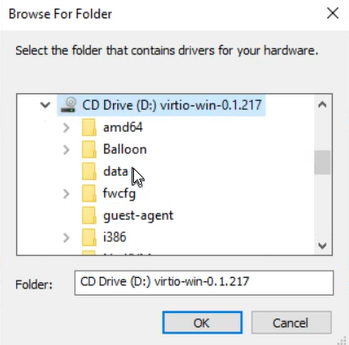
From the virtio-win.iso tile we load the necessary drivers to operate the disk. Select the directory “amd64” > “2k19”.
The desired software is substituted for us, so we click Next.
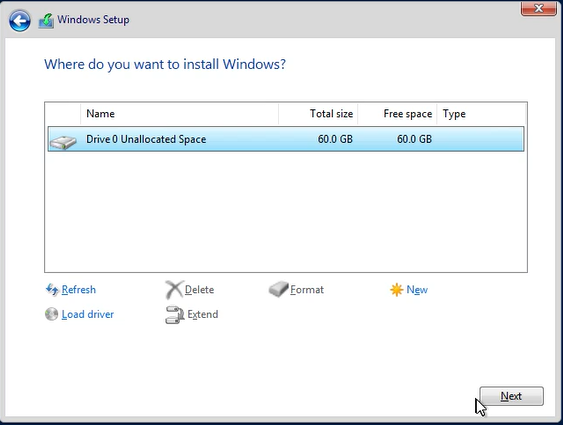
Now we can see the disk. It is now available for further installation. Before we click Next, we will repeat the installation of drivers for other devices. So we choose again: Load driver -> Browse and from the virtio-win.iso plate we load the drivers for better RAM memory support.
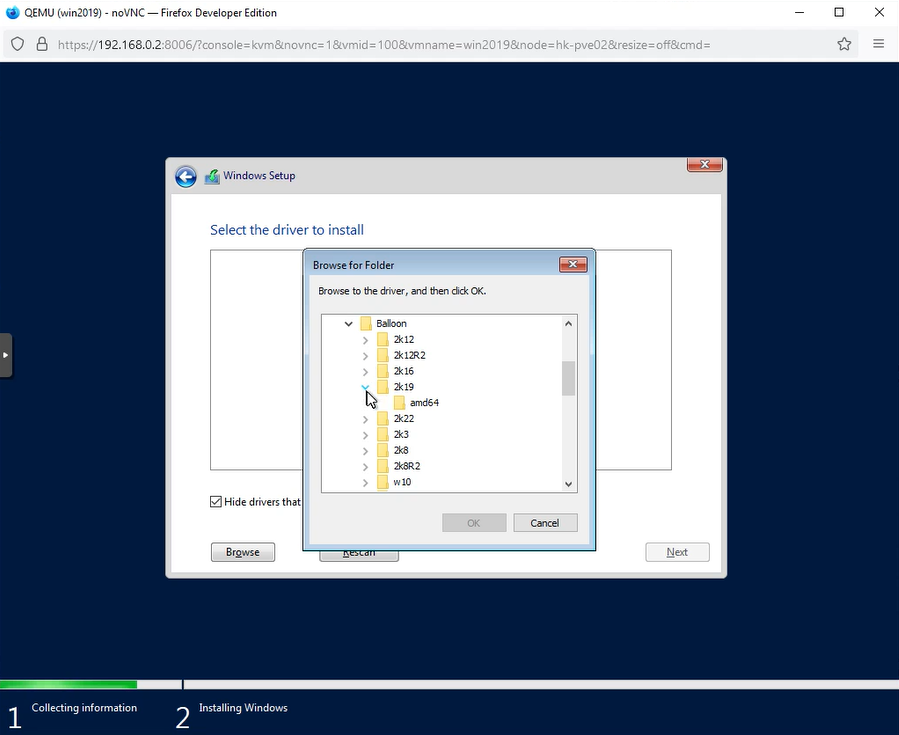
Select “Balloon” > “2k19” > “amd64”. The Baloon driver works in such a way that it does not rigidly assign to the machine all the allocated RAM (4GB in our case), only as much as the operating system needs at a given moment, and leaves the rest at Proxmox’s disposal.
Repeat the above procedure and select: “NetKVM” > “2k19” > “amd64”. It’s a network card driver.
At this point, we already have all the necessary drivers. We can still look for other optional ones that will make our work easier. For example graphics card driver or “vioscsi” > “2k19” > “amd64”. Later, I will give you a more convenient and faster way to install all these drivers. Of course, we wouldn’t start the system installation without manually uploading the disk driver. Now having our drive selected by default in the window from which we installed the drivers, click: Next.
Time for a coffee or other necessary break 🙂 . We need to give the system a longer time to install itself.
After the installation is complete, the machine will reboot and ask you to enter the password for the administrator account.
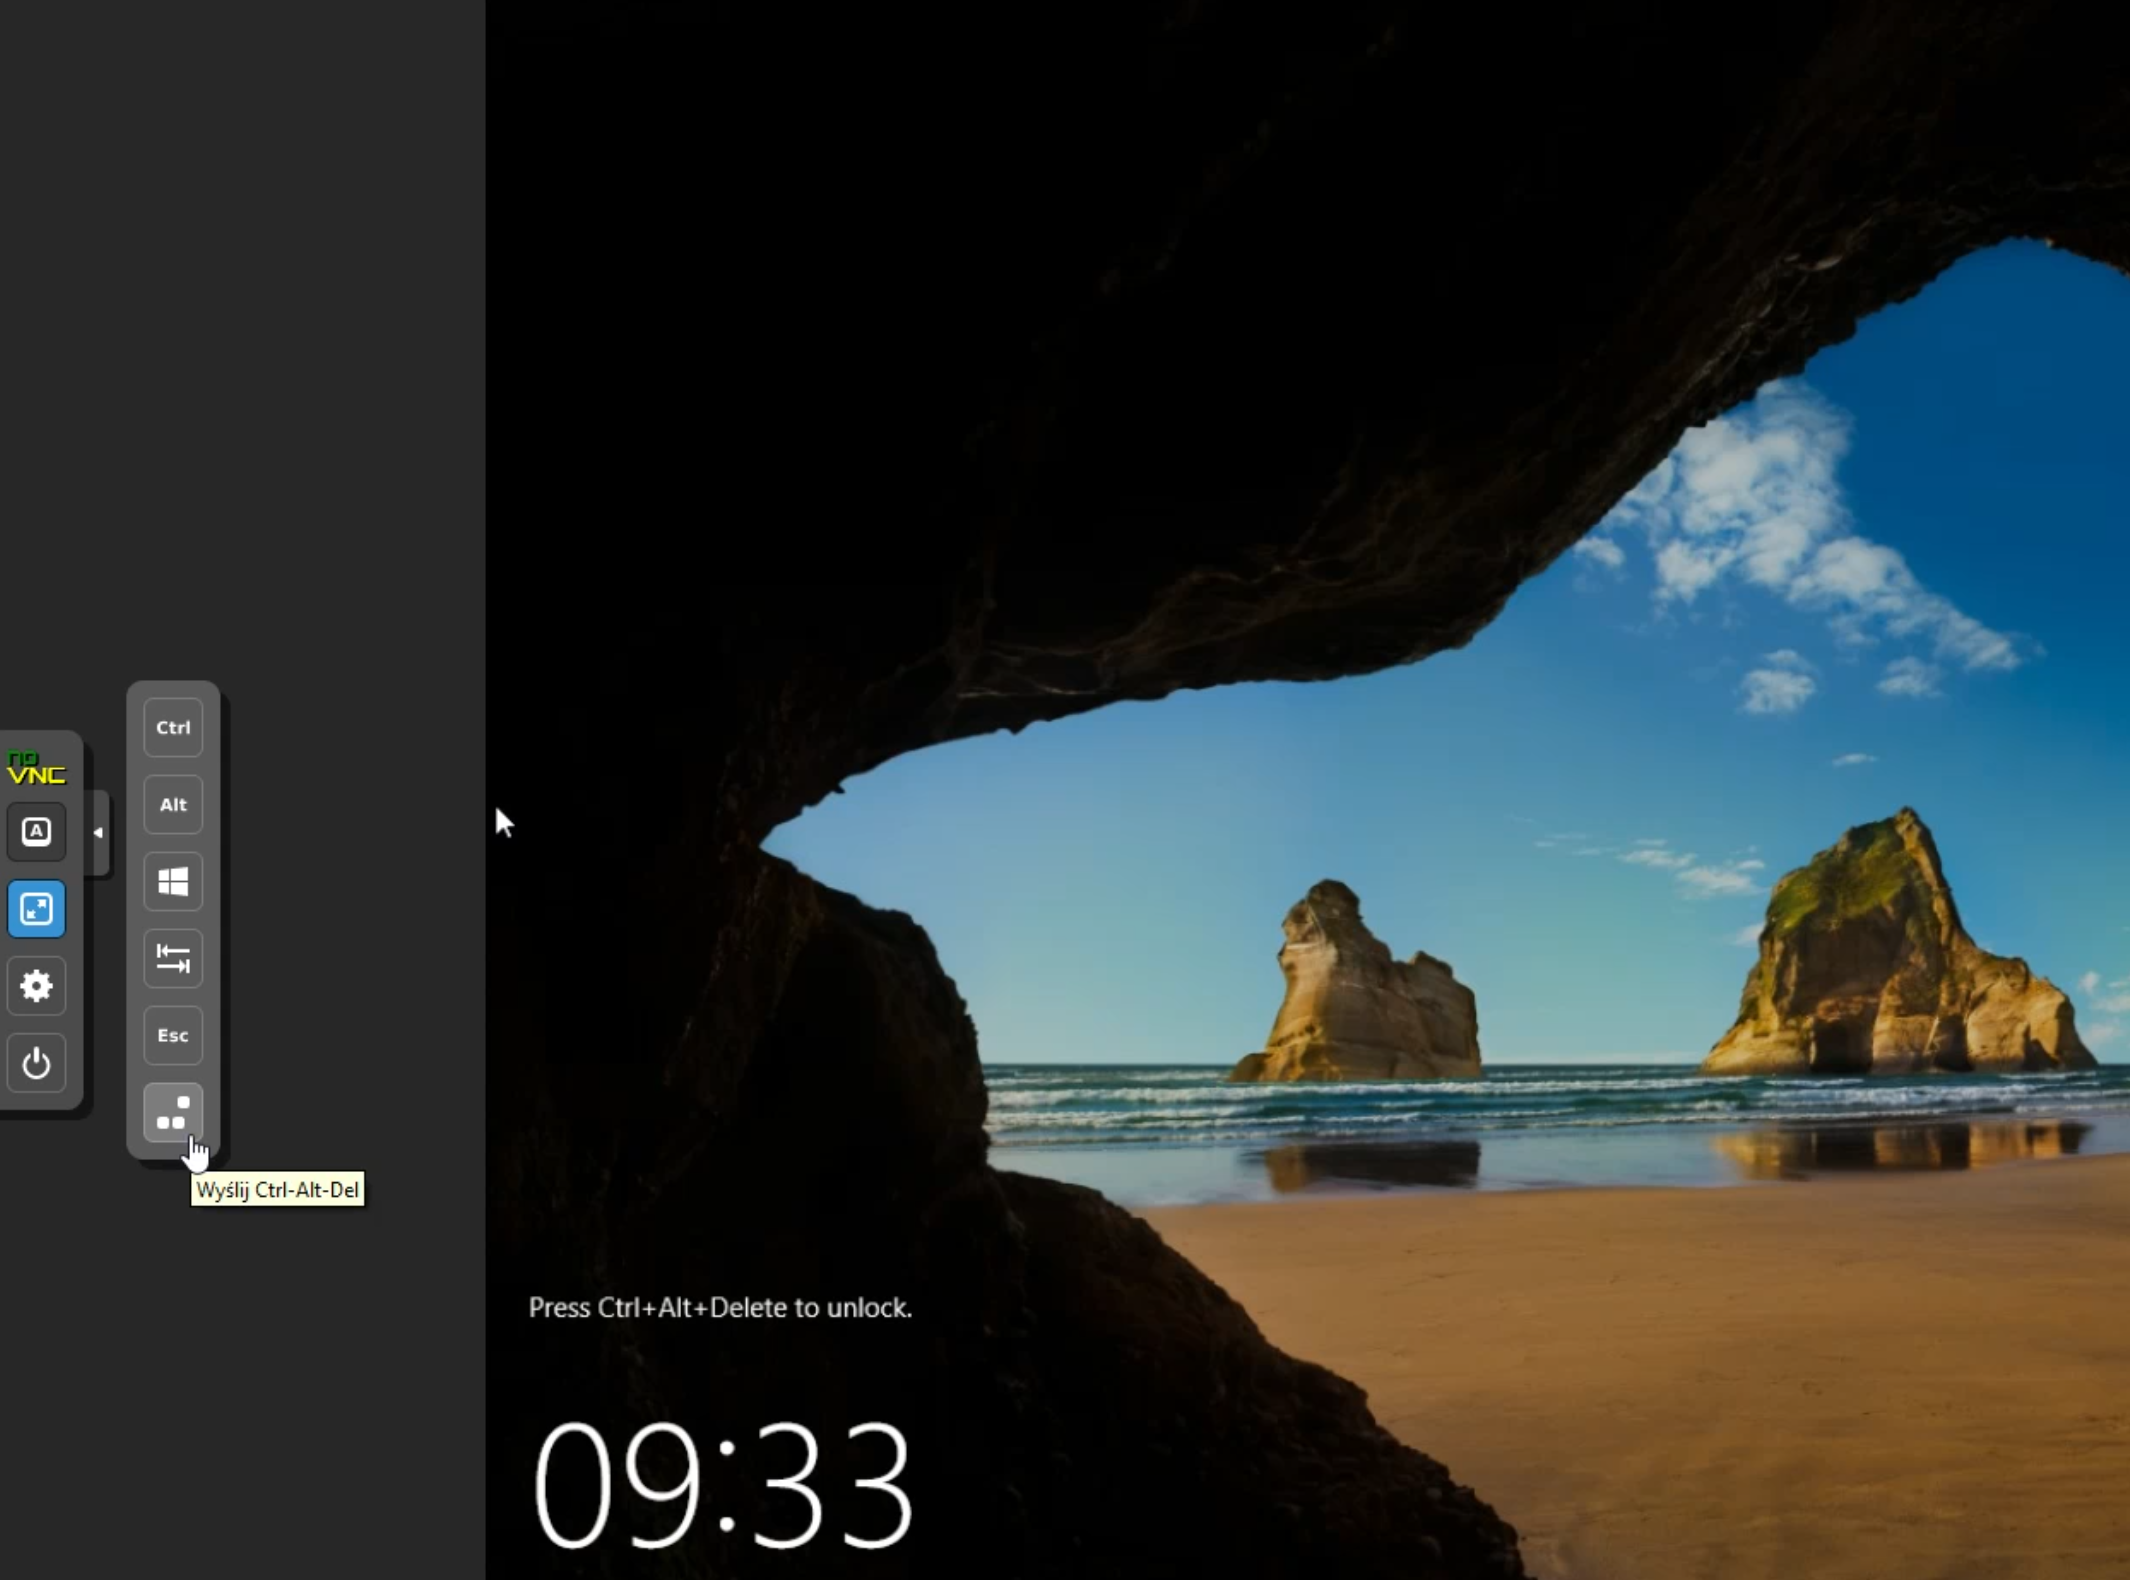
After that, the system goes to the familiar Windows login window. The VNC console allows you to select the necessary options using the panel with side drop-down buttons on the left. Click the CTRL ALT DEL icon to log into the system.
4) Server configuration
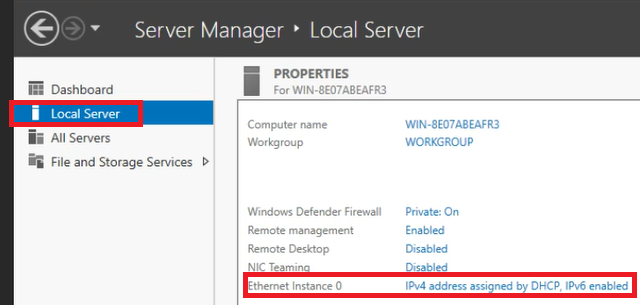
After logging in, we allow our computer to be searched on the local network and set the IP address. From the server manager, click on Ethernet Instance 0. This will open a connection list that contains Ether Instance 0. Open it.
Now go to Properties.
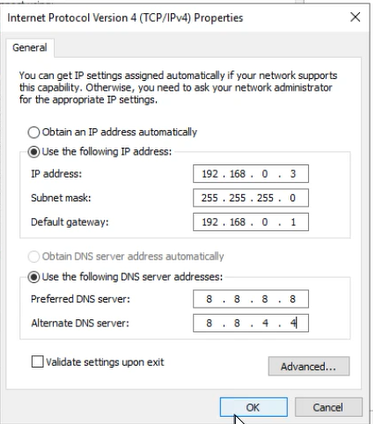
Select: Internet Protocol Version 4(TCP/IPv4) and tick “Use the following IP address”. Enter the prepared IP address, subnet mask, default gateway and DNS servers. We use reliable Google servers: 8.8.8.8 and 8.8.4.4
Optionally, for ease of work, right-click on the desktop and enter “Display settings”. There you can change attributes such as text scale or machine resolution.
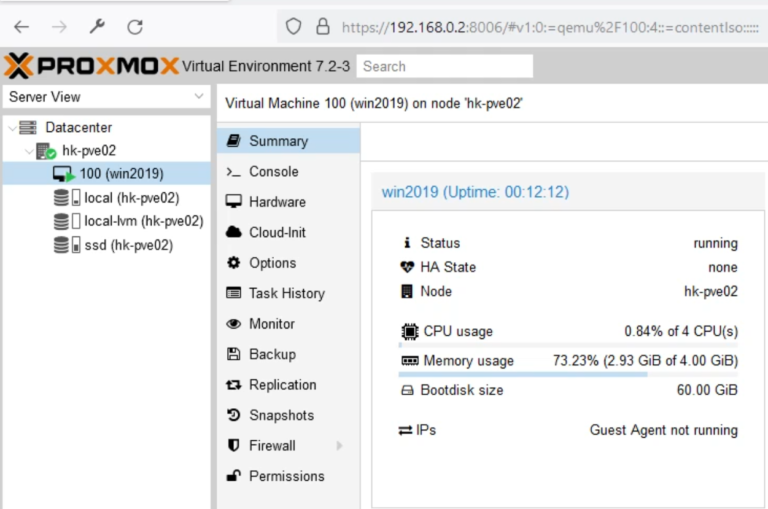
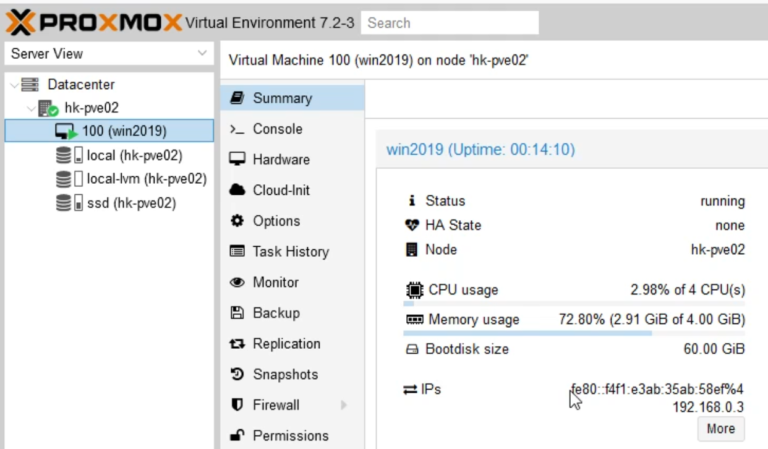
Looking at the Proxmox console, we will notice that it does not see the IP of our machine yet. The displayed message: Guest Agent not running, tells us that we need to install additional controllers and drivers. This can be done manually as described below, either in the hint at the end of the article find the easier and faster method I mentioned earlier.
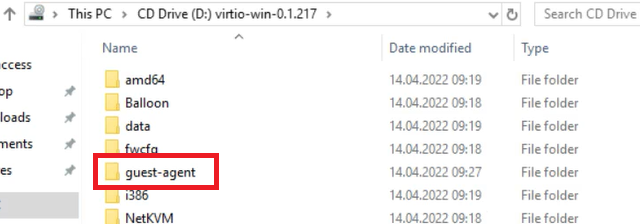
The controllers necessary for communication are embedded in an executable file on our virtio-win board. Now go to the CD Drive (D:) to which this CD is connected.
In the “guest-agent” directory, run the “qemu-ga-x86_64” application.
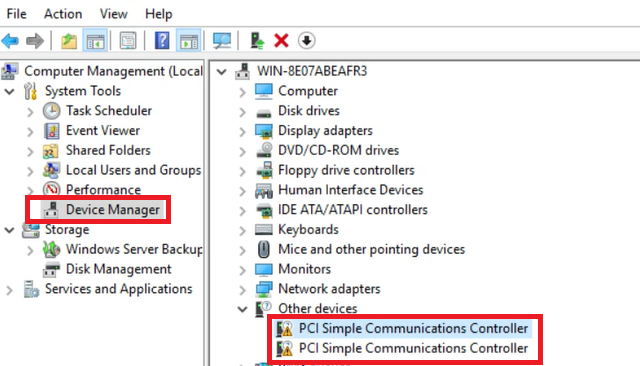
Now go to Server Manager and in the Tools tab select Computer Management. Navigate to “Device Manager” > “Other devices” > “PSI Simple Communication Controller Properties”.
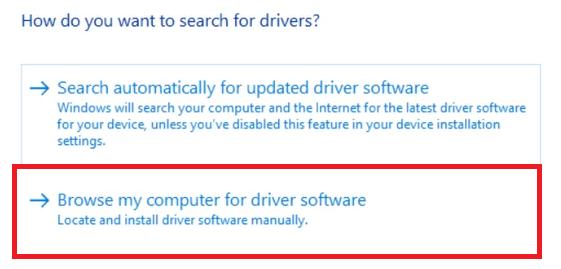
Two unknown devices can be seen here. Click on each of them and install the drivers: select “Update Driver…” > “Browse my computer for driver software”.
You will find the drivers on the previously used virtio-win CD in the directory “vioserial” > “2k19” > “amd64”.
After installing the drivers, the Proxmox console shows the IP address of our machine.
After installing the driver for the drive, you can skip installing drivers for the network card, better RAM support and more. Let’s install the operating system first. Before we start configuring it, point no. 4 of this article, you can use a ready-made program that installs both the drivers listed above and many others useful in the work of the server, and the controller and drivers for the Guest Agent that have just been installed.
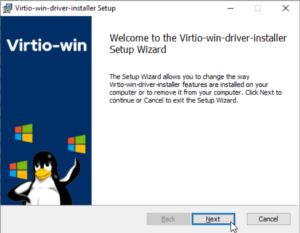
To do this, enter the CD Drive (D:) to which the virtio-win.iso CD is connected. Start the virtio-win-guest-tools program from the root directory. We go through the installer without any changes, agreeing to all the default options.
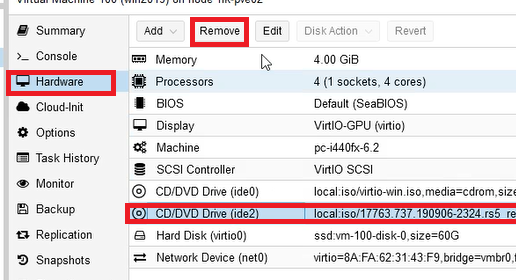
Now, from the Proxmox console, we can completely remove the extra drive with the operating system disc. We will no longer need this CD, much less two CD/DVD drives. To do this, we must first shut down Windows and stop the machine. Any changes to the Hardware configuration can be made only on a turned off machine. Select Hardware -> CD/DVD Drive (ide2) and press Remove.
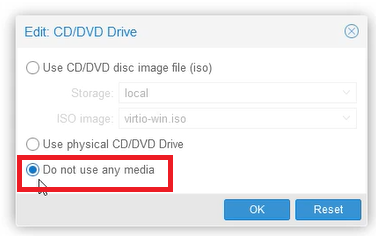
From the second drive, we can remove the CD with the drivers. Select Hardware -> CD/DVD Drive (ide0) Click Edit and select “Do not use any media”.
Your server is ready to go!
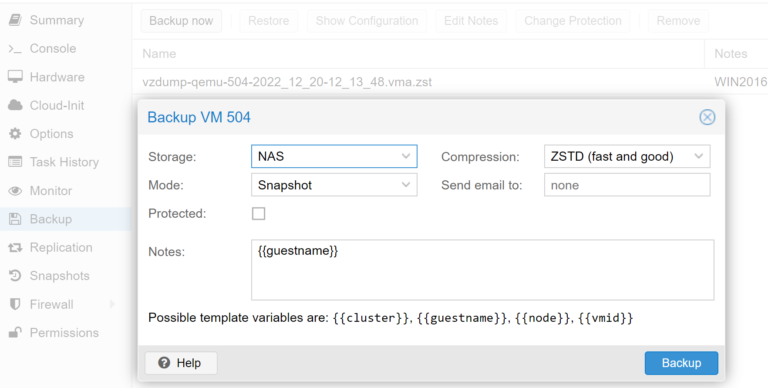
It is good practice to make a backup of our machine now. Guest Agent allows you to do this also in a running environment. In Proxmox, in the machine menu, select the item: Backup and click: Backup now. In the Storage field, select the place where we will store the backup. Leave the other options unchanged and click: Backup. Thanks to this, we will always be able to return to the machine image from the state just after installation.
You can also move your installed server to another faster disk within Proxmox without even interrupting the machine’s operation. Read about it in the next post.


